A ControlliQ közvetlen kapcsolatot épít a NAV Online Számla rendszerével, és automatikusan szinkronizálja a bejövő és kimenő számláidat. Az összekötéshez egy úgynevezett technikai felhasználóra van szükség, amelyet a NAV Online Számla felületén hozhatsz létre — az alábbi útmutató lépésről lépésre végigvezet a teljes folyamaton.
1. Bejelentkezés az Online Számla rendszerbe
Látogass el a NAV Online Számla oldalára, és kattints a jobb felső sarokban a Bejelentkezés gombra.
Fontos
Az Online Számla rendszerbe történő belépéshez elektronikus azonosítás szükséges: DÁP mobilalkalmazás (Digitális Állampolgár) vagy Ügyfélkapu+. Ha még nem rendelkezel egyikkel sem, a magyarorszag.hu oldalon találsz információt a regisztrációról.
1
A bejelentkezési oldalon az Elsődleges felhasználó menüpontnál nyomd meg a Bejelentkezés KAÜ-vel gombot. Elsődleges felhasználó az adózó, a törvényes képviselő vagy a NAV-hoz bejelentett állandó meghatalmazott.
2
A rendszer átnavigál a KAÜ (Központi Azonosítási Ügynök) oldalára — itt azonosítsd magad, például a DÁP alkalmazással vagy Ügyfélkapu+ belépéssel.
3
Ha először lépsz be a rendszerbe, a sikeres azonosítás után add meg a kapcsolattartási adataidat (e-mail cím, kapcsolattartás nyelve, telefonszám), fogadd el az Adatkezelési tájékoztatót, majd kattints a Beállítások mentése gombra.
2. Adózói profil kiválasztása
1
Belépés után válaszd ki a kezelni kívánt céget. Ha a választó nem jelenik meg automatikusan, a jobb felső sarokban a Felhasználói profilnál kattints az Adózó-felhasználó kapcsolatok gombra — itt minden olyan adózó megjelenik, akire vonatkozóan aktív képviseleti jogosultságod van.
2
A cég sorában kattints a Megnyitás gombra.
3
Ha először választod ki az adott adózói profilt, egy űrlapon add meg a kapcsolattartási adatokat (e-mail cím, telefonszám), állítsd be a NAV által küldött értesítéseket, majd mentsd el az Adózó adatainak mentése gombbal.
3. Technikai felhasználó létrehozása
Ahhoz, hogy a ControlliQ automatikusan le tudja kérdezni a számláidat a NAV-tól, létre kell hoznod egy technikai felhasználót. Ez egy gépi interfész-felhasználó — a felületre való belépésre nem jogosult, kizárólag az adatkapcsolatot szolgálja.
1
Kattints a felső menüben a Felhasználók menüpontra, majd a Felhasználókezelés linkre — ez átvisz a NAV Felhasználókezelő alkalmazásába.
2
Kattints az Új felhasználó gombra, majd a Technikai felhasználó szekcióban válaszd a Létrehozás opciót.
3
Add meg a technikai felhasználó jelszavát (minimum 8 ékezet nélküli karakter, legalább 1 kisbetű és 1 nagybetű), a kapcsolattartás nyelvét, valamint opcionálisan egy megjegyzést.
4
A Jogosultságok beállítása résznél pipáld be a Számlák kezelése és a Számlák lekérdezése opciókat. (Az eÁFA és az OPG-napló jogosultságokra a ControlliQ-nak nincs szüksége.)
5
Nyomd meg a Mentés gombot.
Fontos
Mindig erős jelszót adj meg a technikai felhasználó részére, és mentsd el biztonságos helyre — a ControlliQ összekötésénél szükséged lesz rá.
4. Kulcsok kimásolása
A mentés után a Részletek oldalon a rendszer megjeleníti a technikai felhasználóhoz tartozó adatokat:
•Felhasználónév (technikai felhasználó login)
•XML aláírókulcs
•XML cserekulcs
Másold ki mindhárom adatot a Másolás gombokkal az előző lépésben megadott jelszó mellé, vagy hagyd nyitva ezt az oldalt egy külön böngészőablakban — a ControlliQ összekötéséhez mind a négy adatra (felhasználónév, jelszó, XML aláírókulcs, XML cserekulcs) szükséged lesz.
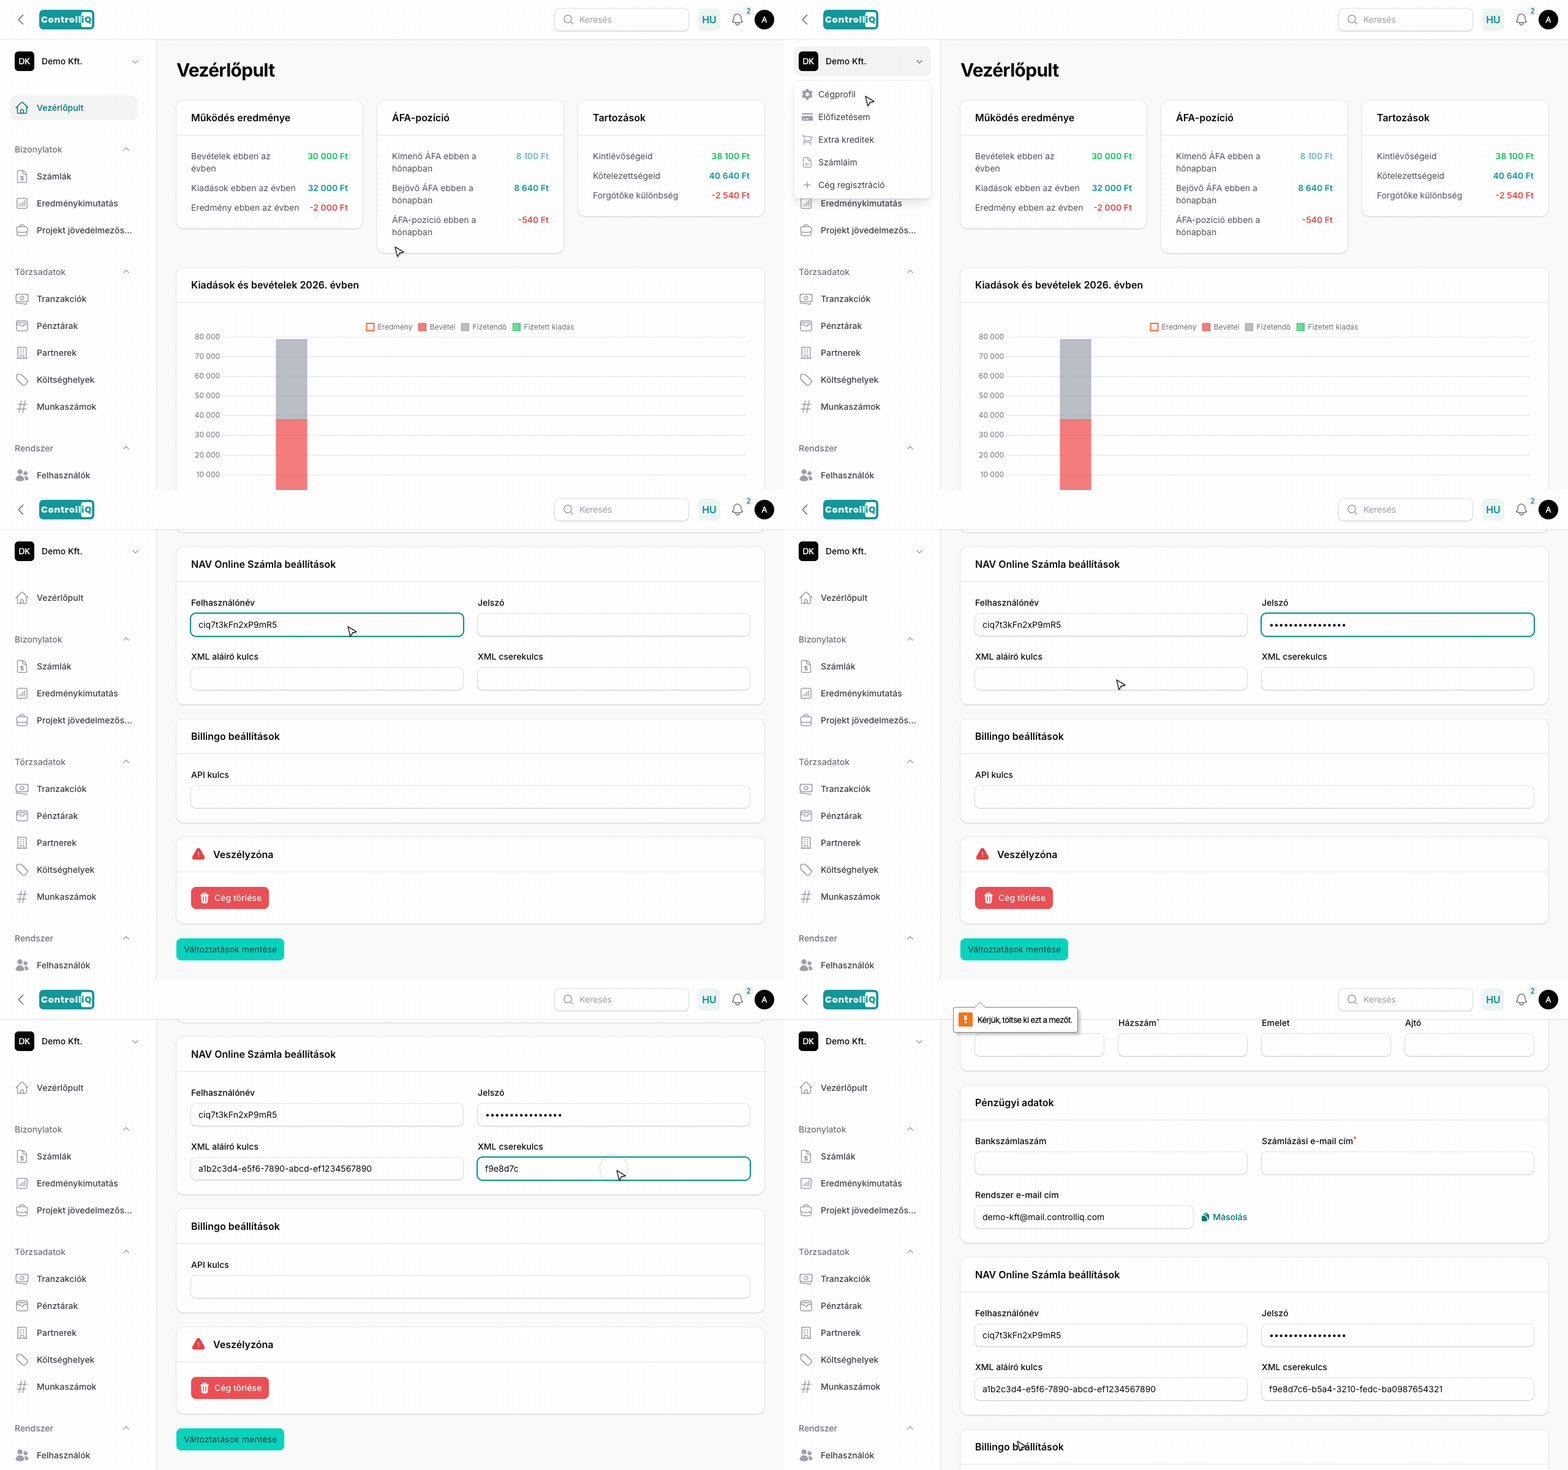
5. Adatok megadása a ControlliQ-ban
1
A ControlliQ-ban kattints a cégnévre a bal oldali menüben, majd válaszd az Integrációk menüpontot.
2
Görgess a NAV Online Számla beállítások szekcióhoz.
3
Add meg a technikai felhasználó adatait: login, jelszó, XML aláírókulcs, XML cserekulcs.
4
Kattints a Mentés gombra — ezután elindul az automatikus számlaszinkronizáció.
Tipp
Ha a kulcsok elvesznének, nem kell új technikai felhasználót létrehoznod: a NAV Felhasználókezelőben a technikai felhasználó adatlapján bármikor generálhatsz új kulcsokat.