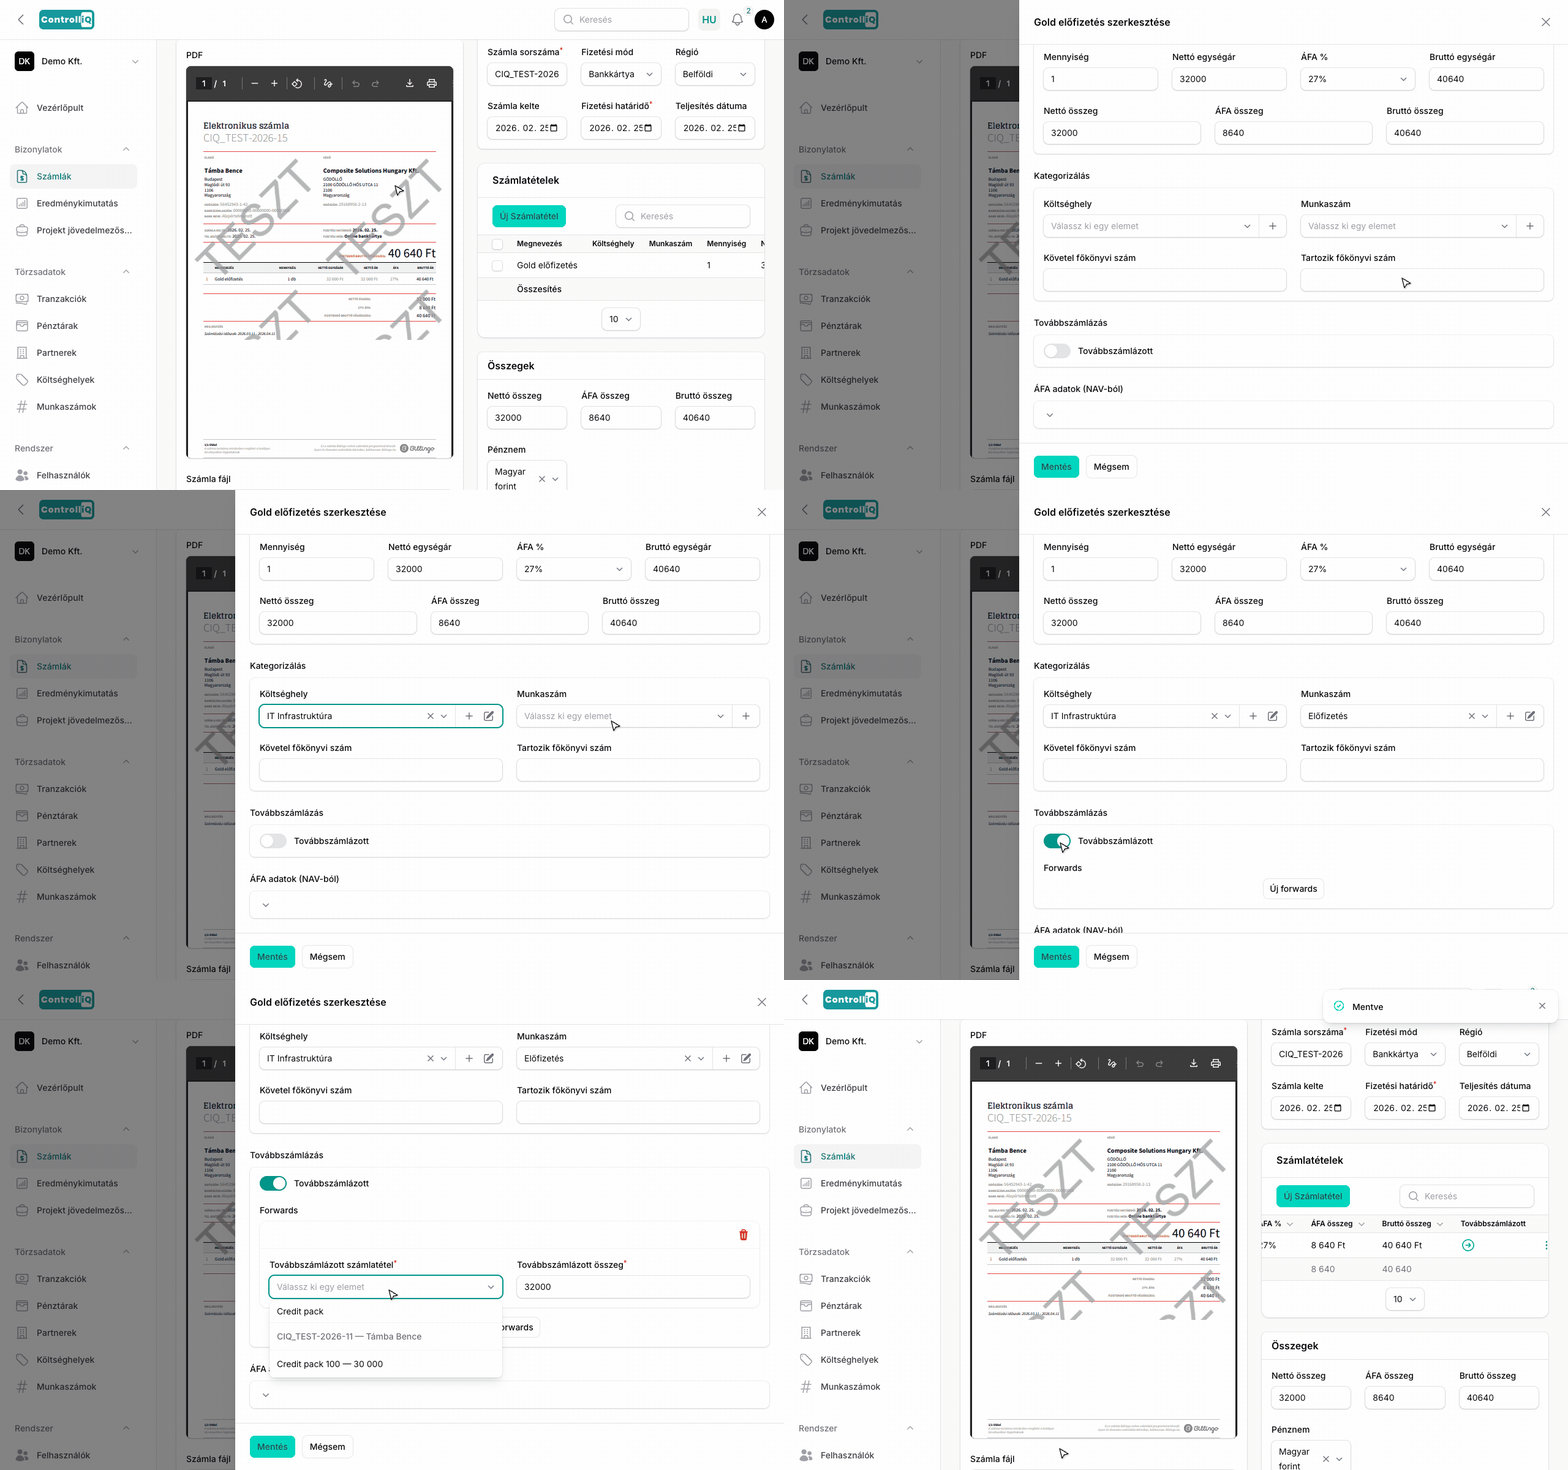
Az AI által kinyert vagy a NAV-ból szinkronizált számlaadatokat bármikor szerkesztheted.
Szerkeszthető mezők
A számla szerkesztésénél az alábbi mezők állnak rendelkezésre (a felületen megjelenő sorrendben):
•Partner — A számla kibocsátójának vagy címzettjének adatai. A partner neve melletti ceruza ikonnal szerkeszthető, a plusz jellel új partner hozható létre.
•VIES érvényes — Közösségi adószám megadásával automatikusan ellenőrizhető; törlésével eltávolítható.
•Számla sorszáma — A számla egyedi azonosítója (kötelező mező).
•Régió — Legördülő menüből választható (belföldi, EU, harmadik ország).
•Számla kelte — A számla kiállításának dátuma.
•Fizetési határidő — A számla esedékességi dátuma (kötelező mező).
•Teljesítés dátuma — A teljesítés dátuma.
•Időszak kezdete / Időszak vége — A számla által lefedett számlázási (elszámolási) időszak. Visszatérő szolgáltatásoknál hasznos (pl. „áprilisi számla", „2026 Q2"). Az AI automatikusan kitölti, ha a számlán megtalálja — explicit dátumtartomány („Számlázási időszak: 2026.04.01 – 2026.04.30") és implicit hivatkozás (hónap, negyedév, év) alapján is.
•Összegek — Nettó, ÁFA és bruttó összegek.
•Tételsorok — Egyedi tételek hozzáadása, szerkesztése vagy törlése.
•Megjegyzések — Egyedi megjegyzés hozzáfűzése a számlához.
Számlatételek kezelése
A számlaűrlapon a Számlatételek panel egy áttekintést mutat: tételenként a megnevezést, a kategorizálást (költséghely · munkaszám) és a bruttó összeget, alul pedig a nettó/ÁFA/bruttó végösszeget. A kategorizálatlan tételeket sárga jelzés és figyelmeztető csík emeli ki.
•Egy tétel javítása — kattints a panel sorára, és a jobb oldalon megnyílik a tétel szerkesztő lapja.
•Több tétel egyszerre — a Tételek kezelése gombbal teljes szélességű táblázat nyílik, ahol kereshetsz, rendezhetsz, új tételt vehetsz fel, és a sorok kijelölésével tömegesen kategorizálhatsz vagy törölhetsz.
•Csak a hiányosak — a figyelmeztető csík Kategorizálás gombja rögtön a hiányos kategorizálású tételekre szűrve nyitja meg a táblázatot.
Számla tételek beállításai
Minden egyes számlatételnél az alábbi kategorizálási lehetőségek állnak rendelkezésre:
•Költséghely — Költséghely hozzárendelése a tételhez. Ha a kívánt költséghely még nem létezik, közvetlenül a szerkesztő felületen is létrehozhatod.
•Munkaszám — Munkaszám hozzárendelése a tételhez. Ugyanúgy helyben létrehozható új munkaszám is.
•Továbbszámlázás — Bekapcsolható a továbbszámlázott tétel jelölés, amelynél megadhatod a kapcsolódó kimenő számlatételt és a továbbszámlázott összeget. Így a bejövő költség és a hozzá tartozó kimenő bevétel összekapcsolható tétel szinten.
Ezek az adatok az exportokban is megjelennek, így egy esetleges ellenőrzés során pontos, tételszintű adatszolgáltatás adható.
Számla kép
A számla részletes nézetében megtekintheted az eredeti számlaképet (PDF). Ha a számla NAV-ból érkezett és nincs számlaképe, feltöltheted manuálisan.
NAV újra-kiolvasás
Ha az AI félreolvasta a számlasorszámot, vagy időközben módosult, a számlasorszám mező előtt található NAV-logós gombbal egy kattintással be tudod tölteni a hivatalos NAV adatokat:
1
Javítsd ki a számlasorszámot a helyes értékre.
2
Kattints a számlasorszám mező előtti zöld NAV ikonra.
3
Erősítsd meg a megerősítő ablakot. Ne hagyd el az oldalt, amíg fut — általában néhány másodperc.
4
A NAV INBOUND és OUTBOUND irányban is keres; ha valamelyikben megtalálja, a fej- és tételadatok frissülnek a NAV-hiteles értékekkel.
Mi marad érintetlen a NAV újra-kiolvasás után? A felhasználói adatok, amiket a NAV soha nem ad meg: számlázási időszak, iktatószám, jóváhagyási / feldolgozott flagek, megjegyzések, valamint a tételsorokon a költséghely, munkaszám és továbbszámlázási jelölések.
Mi íródik felül? Szállító és vevő adatok, dátumok (kelte, teljesítés, fizetési határidő), pénznem, nettó / ÁFA / bruttó összegek, és a tételsorok pénzügyi mezői.
Ha a NAV nem találja a megadott számlasorszámot, vagy technikai hiba történik, semmi nem íródik a számlára — egy figyelmeztető vagy hibajelző üzenetet látsz, és a számla változatlan marad. Az eddigi mentetlen kézi módosítások viszont elveszhetnek, ezért a NAV újra-kiolvasás előtt érdemes egyszer rákattintani a Mentés gombra.